
When your cinematic wedding film is all shot, the day is done and your legs and arms have turned to jelly, its time to step into the office and start colour correcting and colour grading your footage.
But before we get into the how, we need to step into the what?
We will step you through the process in how we colour grade our wedding films from scratch. This tutorial was completed using FCPX, however you should be able to follow along with Adobe Premier and Davinci Resolve.
Our process of colour grading and colour correcting does not require a LUT (known as a lookup table) which in short, is a pre-set you can use to give your final result.
The example I will show really combines both colour grading and colour correcting in one. The reason being is we’re only editing one clip, however, best practice would be to colour correct all your clips first in your timeline, then colour grade your clips thereafter for a consistent look.

What is colour correcting?
Colour correcting clips fixes the hues and tones of the image that appear to be out of sync, this is especially important on skin tones. Once you have imported all your video clips into your timeline, go through each one and correct them to be the same, and only then should your colour grading be applied to all your clips as a second layer.
TOP TIP: Nestle colour grading under your colour correction settings so it doesn’t affect your overall image, if you put the colour grading on top of the colour correction, you will run into problems with colours once more.
What is colour grading?
This is your little touch to the film that makes it unique to you, there is no right or wrong way, its just the polish on the final product to invoke a mood that matches the tone of your film. You can be as experimental as you like. Once you have your look, you can save it as a pre-set or a LUT and apply it to all your clips in your timeline.

Before we begin and for all the camera-nerds out there, this footage in this example was shot on the Sony A7Siii paired with the Sony 50mm f1.2 GM. We were shooting in 4K, ProRes 422, 10bit, S-LOG on the Atomos Ninja V. This flat profile allows for a high dynamic range to implement these settings. It is not suggested to follow this tutorial if you shoot in 8-bit or standard profile settings on your camera.
On the subject of cameras, it’s important that on the day you shoot your scene correctly. Especially important if your subject matter has a human subject. Skin tones can be dramatically impacted if your video is shot incorrectly, i.e wrong white balance, thus a tougher time in the editing room to correct those mistakes.
When shooting we keep the skin tones around 45-65% IRE on the waveform/false colour and usually keeping the whole scene within 25%-80% for the majority of the scene so we aren’t over or under exposing the scene. (Note, this excludes specular highlights, lights, or that giant ball of gas in the sky. This is to ensure we have a lot of dynamic range without clipping the highlights or the blacks while retaining correct skin tones for our subject. If the lighting is tricky, aim for skin tones first at the sacrafice of deep shadows or bright highlights.
White balance on your camera should be set to manual and by either using a pre-set white balance (sun cloud, tungsten etc or a kelvin value if you’re a run and gun videographer). You could opt for a white card if you have the time to set it up, but lets face it, we’re usually far too busy on the day. This will also mean less time in the editing room later correcting your mistakes.
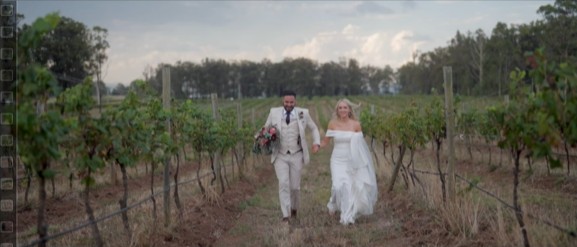
With that all being said and done, lets first check out a timelapse of the process to see the before and after then delve into each step and why that change was made.
Colour Correcting
First lets start with colour correcting the clip’s saturation and contrast. Before you begin, make sure to open both the Vector Scope and RGB Overlay, these will be needed to keep an eye on during both grading and correcting your clips.
Import your footage into your editing software, once it’s in you should notice that it looks very flat, no colour, no contrast and just plain awful. This is a good thing, it means that we have a lot of dynamic range to play with.
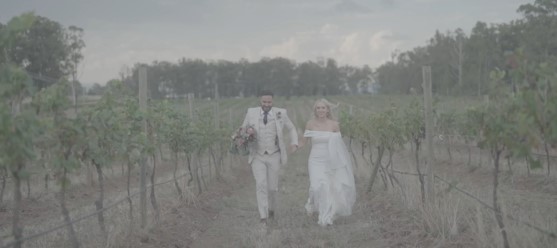
LOG footage should look a little something like this, plenty of details to play with, so don’t worry!
You can see with the Vector Scope a wheel with all the prime colours and a smudge of white in the middle. That smudge represents all the colours and saturations in your clip, the bigger that smudge in the middle grows the more saturation has been applied. You will also notice that it will lean towards the more dominant colour in your clip depending what it is you’re shooting (in this case it’s leaning towards more green due to the vines and grass and a llittle on the blue side) this smudge will expand outwards the more saturation each colour receives.

Vector Scope shows the full wheel of colour, the white in the middle represents your image, the more it grows outwards the more colour in the image, it will lean towards any dominant colour.
The RGB Wave form overlay will show you your highlights and shadows from left to right this is the light values it sees in the clip from left to right. Anything below zero will be crushed blacks (pure black) and anything beyond this point will have no details, just black. While on the right side you have your highlights represented as 100. Anything above 100 is clipping the highlights as pure white, if you try to do any colour adjustments in anything over 100 it will just become muddy.
If you have shot your video correctly, it should look something like the below, your exposure for an overcast day with minimal highlights or dark shadows should sit around 25-75%. Over the next few steps below we will expand these out to zero and 90.

RGB Wave form shows in white the brightness of the image scanning it left to right, the two white towers in the middle is the bride and groom. The RGB (red, green blue) are your colour valves acting the same way as the brightness, the top of the wave form is highlights and the bottom is the shadows, anything in the middle is your midtones. 100+ is clipping white, 0- is clipping black.
Open up the colour board and lets first add some saturation to the clip. I usually drop the shadows and highlights by 5% so nothing in the darkest shadows or brightest highlights are too saturated. While the midtones are pushed right up to get colour back into the overall clip. This will inject all the colour that was missing from your clip when shooting in LOG.

You can control saturation in the highlights, midtones and shadows independently. Which is much more accurate.
The video clip should have some nice colour to the image, however it still looks pretty muddy, we will fix that step with some exposure corrections.

The clip now has more colour in the image. As it’s a wedding, I don’t tend to go overboard with colour.
As a baseline we have raised the highlights up to around 100 and dropped the shadows down to zero, this will generate contrast in the clip. Making sure that you don’t go below zero or go above 100. You can manage to keep an eye on these adjustments using the RGB Overlay.
We have also brought down the midtones a little bit as the overall exposure was a tad too bright with these changes considering the overcast conditions, this will keep the scene moody.

Blacks have been dragged down until they reach 0 and highlights are raised until around 90-100%

The RGB Overlay shows nothing clipping in either the Blacks or the Whites and midtones are sitting around 25 IRE. You can see the couple are the two white marks in the middle, they are around 75% in the image.

Now the clip has much better contrast, no blacks or whites are clipping, we still retain all the detail.
The video clip should now start taking form. You maybe wondering why I didn’t push the lightlights to 100%? Great question, reason it wasn’t, is that on the day a storm was overhead and I wanted details in the clouds behind them. I will reserve 100% highlights for the sun, any lights and specular highlights. As this image doesn’t have any of those, i’ve kept the brightness down to preserve all details in the brightest parts of the cllip, which is the clouds in this instance.
I now move over to ‘colour’ and make some eyeball adjustments with the help of the Vectorscope to fix the tones. For this clip it’s a little too cool when shot. So i’ve moved the shadows slider over to the red and injected a little warmth in the shadows and the midtones where brought over to the blues and brought down for a little more yellow. The midtone adjustment was to preserve the skin tones due to the previous change in the shadows. It’s subtle but the clicp looks more balanced.

You can move each Highlight, Shadow and Midtone independently, best not to use Global as this will affect the whole clip. Target the troubled areas. You can look at the RGB Overlay to see when colours are too out of balance.

The dress and the suit is warmer than the cooler sample clip before the changes.
And that’s it for colour correcting the clip for now. You could quickly check the skin tones (which I’ll show you later) and then export. However, if you wanted to give it your signature look, then keep reading on as we will go through the colour grading component of the edit.

Colour Grading
Firstly we like to play with the luma of the image in the colour curves, and to do that we can create an s-curve. Best thing about working in curves is that it only works in the confines of your clip contrast that we created (i.e it works between 0 and 100 of your clip). You can be more precise on the adjustment of the contrast that you are looking for without clipping highlights or crushing blacks.

On the left at the bottom, that’s the darkest part of your image. The top right is the brightest. You can then bend and move the line by making points to finetune your contrast. Make sure it flows, any sharp changes can cause noise in your image and lose detail.
We’ve brought the lower end of the blacks (bottom left) down to bring in deeper shadows, then left the lower midtones where it was. We then brought the mid-highlights down to flaten the contrast for the majority of the scene. Essentially this is an S-curve, but keeping the image more moody, i’m not looking for anything too bright or contrasty for this image, we can achieve more contrast using colour later.

Very subtle change as this clip was fairly close to where I wanted it.
The next step in the colour curve is to individually colour grade the RGB valves. We haven’t touched too much in the highlights of this image as they look pretty good where they are however we want to bring in a warmer feel of the sun setting behind them so we introduced a little yellow into the clouds (top right of the blue line). We’ve made a lotmore changes in the shadows by bringing out more reds into the soil and more warmer tones in their clothing and the trees/vines. You can play around with these to your liking. Remember to be subtle, any major or dramatic change can degrade your clip.

Like the LUMA you can adjust each RGB value from Shadow, to Midtone, to Highlights. Note, any midtone adjustment will affect skin tones.

The colours are looking more earthy while still preserving the greens.
It’s’s time to move over to the Hue/Saturation Curves. This has a lot of settings we can play with. The first lot of settings is Hue vs Hue, this will adjust the Hue values for the clip for the colour you select. You can play with any colour in the image by eye dropping on the clip (hold down and move the mouse to expand) what collour you want changed in your clip. (i.e you may want to make purple turn to blue).
First we wanted to fix skin tones, so we’ve made a minor change to the oranges so the red tones in the skin are more yellow (I will check my skin tones again at the end for accuracy). We’ve adjusted the yellow’s and green’s aswell so they are a little less fluorescent and yellow to be more green. We tweaked the red/pink hues to give the bouquet its correct colours. Note adjusting the yellows towards green can make your subjects pop as yellow’s blend with skin tones, reducing the yellow’s will make your subject stand out of the scene.

Using the eye dropper on the clip is a great way to select the colour value you want to shift.

Really subtle changes, however the brides skin is looking better
Looking at the clip we want to reduce the saturation of certain colours with Hue vs Sat, so the yellows, greens and some of the orange has been stripped of their colour while the red/purple has been increased to give more pop of colour in the bouquet. Be careful, not too much as lips will be affected too.

A more drastic change in the saturation while preserving the blues.

The image is looking much more balanced, the greens and yellows are not over powering the image making more focus on the couple.
The LUMA vs Saturation has had some mild touches too. We have eye dropped the skin tones and brought up the luminosity of the orange (skin). This has not only lightened up the skintones but also lightened up the yellowy grass to give it contrast in that colour value. We have also reduced the saturation on the pinks so the bouquet isn’t too colourful, rembering my aim here is to have a flat and moody clip that still has pop.

Remember to be subtle, big adjustments can start degrading the clip.

It’s almost there, the clip is looking almost perfect now.
The Luma vs Sat and the Sat vs Sat shows you values from the shadows (left) to the highlights (right). We prefer to roll these off on the edges. What this does is that in the darkest and lightest parts of the clip it won’t have any strong saturation. This technique is a lovely way to keep a nice flat image with no bold colours which can leak in in those areas. The midtone saturation and luma remain as they are.

Rolling off the Luma and Sat in the shadows and highlights keeps the image nice and flat in both colour and in brightness
You can see it better here below, the image below of the wave form on the left shows it with the luma and saturation roll off applied while the wave form on the right is what it was before. You can see in the shadows down below how much it took the blues and brightnesst back up from below zero and you can see the highlights and reds have been brought back closer to 95%.

Left is the roll off applied, right is the original

Its very subtle, but every change leads to a better image.
We want to make a slight adjustment to the Orange Vs Saturation (mostly on the skin tones here). We brought the midtones down in the oranges while bringing up the saturation in the highlights and shadows, to give a little more contrast of colour in the darker and lighter parts of their skintones.

Orange vs Sat – same as luma, left is shadows and right is highlights

Clip is graded, now to double check skin tones
Lastly is to check the skin tones to make sure that they are correct. By selecting a draw mask, draw around the skin and check the values in the Vector Scope.

Creating a mask on the skin so only that colour will show in the Vesctor Scope
The vector scope has a line from the center of the wheel towards the outer red, this line is your skin tones line (for all skin colours). You may need to make adjustments to your midtone colours in your colour board or colour wheels if the skin tones don;t sit on this line. Allso not the distance of that line, the closer to the centre is greyscale and if the line was closer to the outer edge of the circle it would have full saturation.

On the right you can see only a small portion of the skin is chosen, this now shows only that colour in the Vectors cope, allowing me to see where it lies on the skin tones line, and it was perfect!
As the skin tones were perfectly on the line, we had no need to make any adjustments to fix this. As you can see, the before and after speak for themselves.


Remember there are no wrong ways to colour grade your image. This is my technique and my desired look. You should always experiment on your signature look that will have your couples coming back for more.
Best of luck in the editing room and I hope this helps you on making better wedding films!